

A worship flag that can rotate on its pole allows for a free expressiveness in worship.

Lightweight fabrics are best for worship flags, as they are are wonderfully expressive in the air.
Heavier fabrics can wear out even a strong arm, as many a worship flagger has discovered.
When my late husband fell in love with worship flagging while at an out-of-town conference, it fell to me to make flags for him. I wanted to make him quality, inexpensive flags that would spin on their poles. But I didn’t know how.
So I prayed and wandered at length through several kind of stores, looking for something I could use to build such a flag. I found the key when I laid eyes on my first box of grommets. From there, I designed his first flag. He loved it. He started a worship flag ministry in our church, and over the years I made many more.
You are free to use this pattern to make flags for yourself, flags for others, and flags to sell.
Please read all these instructions before beginning your project. If you haven’t done much sewing and crafting and have questions, it might help to consult a friend who has more experience.
TABLE OF CONTENTS:
Suggested sizes for children’s flags
Supply list
Equipment list
Size & measurements
Directions
Make a pattern
Prepare the fabric
Sew
Prepare the dowels
Assemble the small dowel
Assemble the flag on the large dowel
Troubleshoot the spin
•
Suggested sizes for children’s flags:
The measurements in these instructions are for a personal adult-size flag.
But you can make these flags any size and style you want.
For ages 2 through 4 years old (or thereabouts): 24″x 16″ with a 24″ pole (fabric size 27″ x 18″)
For ages 5 through 8 years old: 28″ x 22″ with a 30″ pole (fabric size 31″ x 24”)
•
List of supplies for each flag:
• 1 yard lightweight fabric
This pattern does not require quite one yard, but the extra assures enough fabric so the cut edges can be straightened.
Lightweight fabrics are best for worship flags, as they are are wonderfully expressive in the air. But beware of wispy fabrics like chiffons. These are very difficult to work with and are best saved for those with expertise in sewing.
• Thread that matches the fabric
• One 7/16″ x 36″ dowel –– this is the backbone and handle of the flag.
Choose this larger dowel carefully. It needs to be straight. You can check for this by rolling it on the floor; it needs to roll smoothly. If it’s clunky when it rolls, it is warped, and a flag will not spin on it.
This dowel also needs to be able to be sanded perfectly smooth. For this, the grain of the wood needs to run straight down the length of the dowel. Check for cross-grain by rubbing your hand up and down the pole, feeling for rough areas. If the grain of the wood runs across the dowel at any place, the roughness will catch the fabric and keep it from spinning. We have had little success in trying to sand out cross-grain on a dowel, and the flag never spins properly.
It seems to me that it’s harder than it used to be to find a quality dowel. I recommend that you pray for God to provide the ones you need, so you can find a suitable dowel when you shop.
• One 1/8″ x 36″ dowel –– this dowel keeps the height of the flag stretched out so the fabric doesn’t bunch down on the pole.
It is not important for this thinner dowel to be straight, but avoid any extreme warp.
• Two 1/2″ brass grommets –– these are what hold the flag in place on the pole.
You can find these at hardware stores. Use the tall half only, not the flat half.
• Six inches or so of a medium-width or medium-thin-width decorative fabric trim –– this holds the grommets in place.
Avoid wide trims; a wide trim will take up too much of the pole length, not leaving enough handle. Choose a color that will complement either the grommet or the flag color. Some trims are less prone to unraveling, and therefore easier to work with. But if it’s the unraveling type and you love it, it may be worth the extra bother.
• A couple inches of electrical tape. This is to cushion the ends of the small dowel, so the rough wood end doesn’t poke a hole in the fabric.
•
Equipment list:
- (Optional, but recommended): large piece of paper to make a 45″x31″ pattern
- Measuring tape
- Fabric scissors
- Ironing board and iron
- Pins
- Sewing machine
- Needle for hand sewing
- Sandpaper
- All-purpose scissors or knife
- Hot glue gun or tacky craft glue
- (Optional): stain & varnish for the large pole
•
Size of cut fabric:
42-45″ wide; 31″ long
•
Size of finished flag:
Approximately 40-43″ wide; 29″ long
•
Directions:
•
Make a pattern
(Optional): Make a paper pattern 45″x31″.
If you are going to make more than one flag, it saves time and work to use a pattern. Use butcher paper or any other large paper, or even tape smaller paper together. Make sure it’s cut on the square.
Use the pattern to cut the fabric.
•
Prepare the fabric
If you are not using a pattern, start by making sure one end of fabric is cut square.
Fabric is rarely cut straight enough at the fabric store. Determining what is straight can be quite a challenge with some of the fabrics. Chiffons, for example, are impossible. Just do your best; it won’t be a big deal when your wispy chiffons flags are flying.
Measure and cut fabric 31″ long.
If your fabric is 42″ or 45″ in width, it works to use the entire width.
Otherwise, cut the fabric width to 42″ or 45″ wide after cutting the length.
•
Sew the Flag
•
Use a straight stitch to hem the three non-pole edges to finish the edges of the fabric: Along both 42″ (or 45″) sides, fold, iron, and pin a double-folded 1/2″ hem. Turn the edge twice so that no raw edge is showing.
Do the same for the non-pole end of flag.
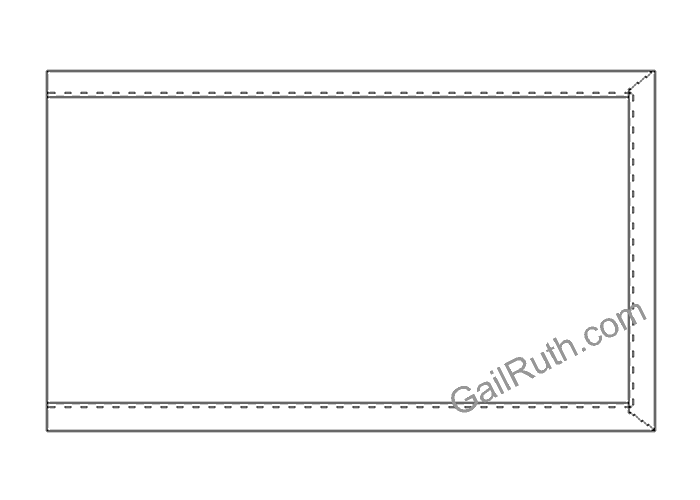
An unhemmed selvage will not hold over time with flag use, so be sure to hem this edge even if the selvage has a clean edge.
Sew close to the edge of the hem, as shown above.
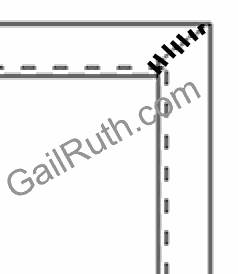
Hand stitch the two corners, as shown in the picture below.
This will prevent the corners from breaking open under the stress of flagging. A few stitches now will prevent having to rebuild the corners later.
•
Pole end of flag
To prepare the pole end of the fabric, you need to make a channel for each dowel.
Fold over 5/8″ of fabric on the selvage edge and iron.
Then fold over 1 1/2″ of fabric, iron, and pin. Be sure to accurately measure the 1 1/2″ fold. If it is too small, the flag will have difficulty spinning. And if it’s too large it might slip over the grommet.
Sew with a straight stitch close to the edge of the hem.

Sew the second row of stitching 1/4″ from first stitching. This will make a channel for the thin dowel.
•
Prepare the dowels
Sand both dowels.
The larger dowel needs to be perfectly smooth for the flag to spin. If this dowel is of poor quality and cannot be sanded smooth, the flag fabric will catch on the rough wood and not spin well.
Be careful when sanding the thinner dowel, as it’s easy to break.
Optionally, stain and varnish, or just varnish, the larger dowel.
•
Assemble the small dowel
Carefully slide the full-length small dowel into the 1/4″ channel.
With a knife or a sturdy pair of all-purpose scissors, cut the dowel to fit the channel, so that it almost fills the length, but does not protrude.
Your aim is to cut the dowel so that it fits comfortably, with a tiny bit of wiggle room, end-to-end in the pocket. The purpose of the dowel is to keep the flag from collapsing on the pole. But be careful to not to cut dowel too long, or it will poke a hole through it’s pocket.
Slide the fabric back from each end of the cut dowel, and wrap a short piece of electrical tape around each end of the dowel––about two wraps per end––and extending a couple millimeters beyond the ends of the dowel.
This adds a bit of cushion, so the hard ends of the dowel don’t poke a hole through the fabric. It also prevents frequent re-sewing of the dowel pocket ends.
Hand stitch the 1/4″ channel closed at both ends so the dowel cannot slide out. Use large enough stitches so they can be removed easily if the small dowel breaks and needs to be replaced.
•
Assemble The flag on the large dowel
At the very end end of the larger dowel, glue a short length of trim around the dowel.
The purpose of the trim is to be an attractive obstruction so the grommet cannot slide past it. Depending on appearance, the thickness of the trim, and your personal preference, you may glue one layer of trim to the pole or continue winding so that you have two or more layers.
Slide a grommet on, so its flanged side is against the trim. The tube side will be hidden by the flag fabric when it is finished.

Slide the larger dowel through large channel in the flag. Fit the flag channel over the tube side of the first grommet.

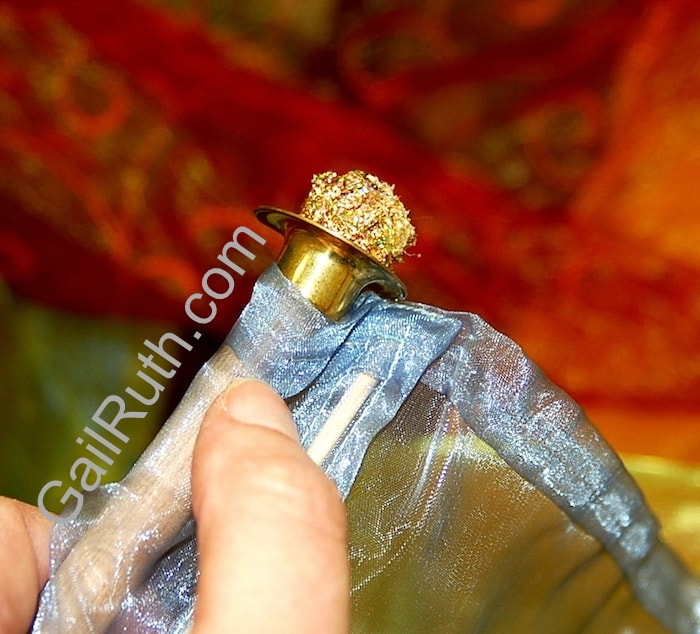
Slide on the second grommet, mirror image to first, fitting the tube into the channel in the flag.
Placement of the second grommet: If the grommets hold the flag too snugly, it will not spin. However, very little slack is needed to allow the flag to spin. You want it tight enough to keep both grommet tube ends tucked into the dowel pocket.
Practice flying the flag by holding the grommet in place with your thumb, making sure the flag turns freely on the pole. Fine tune the grommet placement as needed for optimal spin. Troubleshoot the spin before gluing the second trim. (See next section.)
After you have ensured a good spin, leave about 1/8″ of slack between the second grommet and the trim, and glue a piece of trim around the dowel to hold this second grommet in place––as you did with the top piece.

Your flag is ready to fly!
May your worship of Father God, King Jesus, and the Holy Spirit give both you and Them much pleasure!
•
Troubleshoot your flag
If your flag doesn’t spin well, there may be one or more reasons:
Problem: The larger dowel is warped.
The fix: Replace the dowel with one that rolls smoothly on the floor.
Problem: The larger dowel is rough, catching on the fabric.
The fix: Sometimes you can sand and varnish this out, but other times it requires replacing the dowel with one you can sand perfectly smooth.
Problem: The large dowel pocket is smaller than recommended. Either the fold-over was smaller than 1 1/2 inches, the first line of stitching was too far from the edge, or the small dowel pocket was too wide.)
The fix: Remove the stitching and re-sew OR use a smaller (5/16″) dowel, with a correspondingly smaller grommet size.
But note that the smaller size dowel breaks more easily.
Problem: The second grommet is placed too close and holds the flag too tightly.
The fix: Remove the lower trim and any glue residue. Hold the grommet in place with your hand as you try to spin the flag to determine proper grommet placement. When it is spinning easily, re-glue the trim to hold the grommet in place.